今日はVoyager Live 20.10を使ってみたいと思います
Voyager はXfceをMacテイストにカスタマイズしたディストリビューションです センス良く綺麗にまとまったデスクトップ装飾のセンスは、さすがFrance(フランス)発のLinuxって感じ そんなVoyagerデスクトップは厨二感が半端なく、そう言う系が好きな自分のみたいな人にはピッタリのディストリビューションです
Voyagerは無敵ロジックを持ち合わせた、僕らの最強ギミック
今日はCore i5 3210Mを搭載した Lenovo G580で日本語起動してみたいと思います
インストールする際は、インストール前にLive Bootで試す事をお勧めします
Voyager Live 20.10
![](https://i0.wp.com/lovely910.com/wp-content/uploads/2020/11/002iuahiiua.jpg?resize=1024%2C576&ssl=1)
Release | 2020.11.01 |
Type | Linux |
Based on | Xubuntu |
Package Management | dpkg |
Architecture | x86_64 |
Desktop | GNOME, Xfce |
Download
Lenovo G580
![](https://i0.wp.com/lovely910.com/wp-content/uploads/2019/10/DSC_0584.jpg?resize=1024%2C576&ssl=1)
CPU | Core™ i5-3210M |
RAM | DDR3(PC3-12800 SDRAM)6GB |
VIDEO | Intel HD Graphics 4000 Intel® Ivybridge Mobile |
STORAGE | SSD128GB |
IEEE802.11b/g/n |
Live BootできるUSBメモリの作成
パソコンからUSBメモリを使ってLinuxを起動できるUSBメモリを作成します Windows・Mac・Linuxを使っての作成方法は下記記事を参考にしてください
![](https://i0.wp.com/lovely910.com/wp-content/uploads/2021/03/2021032402.png?resize=160%2C90&ssl=1)
USBメモリを使って起動
USBメモリを使っての起動は、Bios画面のBootメニューで一番に起動するデバイスを、USBメモリを選択します そして再起動します
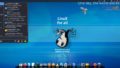
この画面が現れます このままEnter キーを押します
![](https://i0.wp.com/lovely910.com/wp-content/uploads/2020/11/000jiuahiufhaiu.jpg?resize=1024%2C576&ssl=1)
このウィンドウが現れます 左側より使用する言語を選択してUbuntuを試すをクリックします
![](https://i0.wp.com/lovely910.com/wp-content/uploads/2020/11/001hiauhfiahiu.png?resize=694%2C493&ssl=1)
Desktop
起動後の挙動は至って軽快 ★★★★☆
古いパソコンとはいえ、i5を積んでいるので快適に使う事ができます
![](https://i0.wp.com/lovely910.com/wp-content/uploads/2020/11/002iuahiiua.jpg?resize=1024%2C576&ssl=1)
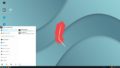
Voyager Live 20.10のデスクトップはパネルは上に設置
Dockランチャーが下に設置 マウスは左ダブルクリック実行の設定です
パネルアイテム 右側
![](https://i0.wp.com/lovely910.com/wp-content/uploads/2020/11/003joahouhiau.png?resize=321%2C131&ssl=1)
Activities
クリックで現在開いているウィンドウ一覧と、右側にワークスペース一覧を表示させます
![](https://i0.wp.com/lovely910.com/wp-content/uploads/2020/11/006hiuhafigfya.jpg?resize=1024%2C576&ssl=1)
パネルアイテム 右側
![](https://i0.wp.com/lovely910.com/wp-content/uploads/2020/11/004jiuaiuhiau.png?resize=588%2C266&ssl=1)
通知領域
通知領域はパネル上は日時を表示
クリックでカレンダーと通知領域をポップアップ表示させます
![](https://i0.wp.com/lovely910.com/wp-content/uploads/2020/11/007jiauhiuaho.png?resize=862%2C768&ssl=1)
Dock ランチャー
Dockランチャーには定番のアプリやツールが登録されています
![](https://i0.wp.com/lovely910.com/wp-content/uploads/2020/11/005hiuhaihfiua.png?resize=1024%2C331&ssl=1)
SMTube
Youtube閲覧アプリのSMTubeです
![](https://i0.wp.com/lovely910.com/wp-content/uploads/2020/11/008jiuahuifyu.png?resize=694%2C475&ssl=1)
デスクトップ上での右クリックメニュー
![](https://i0.wp.com/lovely910.com/wp-content/uploads/2020/11/010joiajoiio.png?resize=226%2C313&ssl=1)
デスクトップの背景の設定
Voyagerオリジナルのデスクトップ背景画像が用意されています
![](https://i0.wp.com/lovely910.com/wp-content/uploads/2020/11/011aojfoijio.jpg?resize=1024%2C576&ssl=1)
System Tools
Settings
各種設定ツールのSettingsです
![](https://i0.wp.com/lovely910.com/wp-content/uploads/2020/11/020kfhaiuhih.png?resize=841%2C641&ssl=1)
Files
ファイルマネージャーのFilesです
![](https://i0.wp.com/lovely910.com/wp-content/uploads/2020/11/021uhaiufhiu.png?resize=837%2C561&ssl=1)
Ubuntu Software
アプリ管理ツールのUbuntu Softwareです
GUI操作にてアプリのインストールを行えるツールです
![](https://i0.wp.com/lovely910.com/wp-content/uploads/2020/11/022hiuhaiuhui.png?resize=832%2C531&ssl=1)
GNOME Terminal
ターミナルエミュレーターのGNOME Terminalです
![](https://i0.wp.com/lovely910.com/wp-content/uploads/2020/11/023uiahiuhiua.png?resize=837%2C532&ssl=1)
Applications
Firefox
ウェブブラウザのFirefoxです
このパソコンでは快適に動作します
![](https://i0.wp.com/lovely910.com/wp-content/uploads/2020/11/030jaoifjiuahui.png?resize=939%2C700&ssl=1)
LibreOffice
オフィスアプリのLibreOfficeです
このパソコンでは軽快に動作します
![](https://i0.wp.com/lovely910.com/wp-content/uploads/2020/11/031joaohfua.png?resize=878%2C651&ssl=1)
Image Viewer
画像ビューアのImage Viewerです
![](https://i0.wp.com/lovely910.com/wp-content/uploads/2020/11/032juajiojio.png?resize=765%2C641&ssl=1)
Rhythmbox
ミュージックプレイヤーのRhythmboxです
![](https://i0.wp.com/lovely910.com/wp-content/uploads/2020/11/033kakpofkpa.png?resize=804%2C622&ssl=1)
日本語入力
Voyager Live 20.10は日本語入力関連のツールはバンドル済みです
設定をして使えるようにします
IBusを設定
Settingsを起動します
Region & Languageを開きInput Methodで日本語キーボードとMozcが設定されている事を確認します
![](https://i0.wp.com/lovely910.com/wp-content/uploads/2020/11/040joiajfjio.png?resize=986%2C462&ssl=1)
ワープロアプリを起動して日本語入力のテストをします
![](https://i0.wp.com/lovely910.com/wp-content/uploads/2020/11/041jofiajoi.png?resize=746%2C626&ssl=1)
インストール
インストーラーは左側にあるアイコンをクリックで起動します
言語を選択して使う事ができるので、比較的簡単に扱う事ができます
![](https://i0.wp.com/lovely910.com/wp-content/uploads/2020/11/050ajijioa.png?resize=1024%2C581&ssl=1)
あとがき
今回はi5を乗せたWindows7世代のパソコンで起動したので、普通に快適に使う事ができました これじゃネタとしては弱いのでCeleron N2830を積んだパソコンでも起動してみました
結論から言うと起動できます そして使えなくないレベルで使う事ができますが、ハッキリ言ってギリギリの一歩手前って感じ デスクトップがGNOMEなのでやはり余裕を持ったスペックで使う事をお勧めします
![](https://i0.wp.com/lovely910.com/wp-content/uploads/2020/11/060koiajoijioa.png?resize=993%2C841&ssl=1)
コメント